

 English


Transitioning home after surgery requires a bathroom setup ready for immediate, safe use. Patients recovering from knee replacements or managing progressive mobility loss face severe risks in unadapted spaces. Most standard toilets sit far too low. They completely lack essential arm support. Buying an over-toilet commode chair without verifying clearance often leads to unstable seating. You end up facing unusable equipment and return shipping headaches. We provide a strict, evidence-based dimensional framework here. You will learn how to guarantee your selected frame clears existing fixtures accurately. This guide ensures your choice fits safely inside your bathroom's unique architectural footprint. We prioritize structural clearance over aesthetic features completely. You can follow these exact steps to eliminate guesswork. Your final setup will support patient recovery and maintain daily dignity perfectly.
Key Takeaways
Measure three critical zones before purchasing: bowl height, bowl width, and the bathroom's baseboard-to-fixture clearance.
An over-toilet commode chair must be used with a splash guard—not a standard collection bucket—to function cleanly over an existing toilet.
Not all commode chairs fit modern "comfort height" or elongated toilets; adjustable leg ranges must exceed your toilet's maximum height by at least 1.5 inches.
Drop-arm models require extra lateral clearance but are non-negotiable for safe wheelchair transfers.
The Cost of Guessing: Why Dimensional Fit Determines Safety
A poorly fitted chair compromises patient safety entirely. It defeats the original purpose of the mobility aid. "Wobble" remains a leading cause of bathroom falls. When a patient sits, the frame must hold completely steady. If the legs sit unevenly over the porcelain, the unit tips. We see these avoidable accidents far too often. They extend recovery times and increase patient anxiety significantly. Proper dimensional fit eliminates this physical instability.
You must understand the variables in modern toilet heights. Traditional toilets measure roughly 14 to 15 inches from the floor. However, modern designs favor taller profiles. "Comfort height" or ADA-compliant toilets range from 17 to 19 inches tall. Standard commode chairs must straddle this porcelain structure perfectly. The structural cross-brace cannot rest on the bowl. If a heavy patient sits on a grounded frame, they risk cracking the toilet bowl. They also risk bending the aluminum frame. The chair must hover slightly above the fixture to maintain four points of floor contact.
Next, consider the "splash guard" necessity. Many buyers confuse standard setups. Proper bedside commode selection involves a solid collection bucket. You place this closed bucket directly under the seat. However, over-toilet use requires a different approach. You must install a bottomless splash sleeve instead. This plastic sleeve directs waste directly downward into the toilet bowl. It prevents unsanitary messes on the floor. It protects the existing porcelain rim. If you use a regular solid bucket over a toilet, you risk severe spills. You also drastically reduce the available clearance space beneath the seat. The splash guard represents a non-negotiable safety and hygiene component.
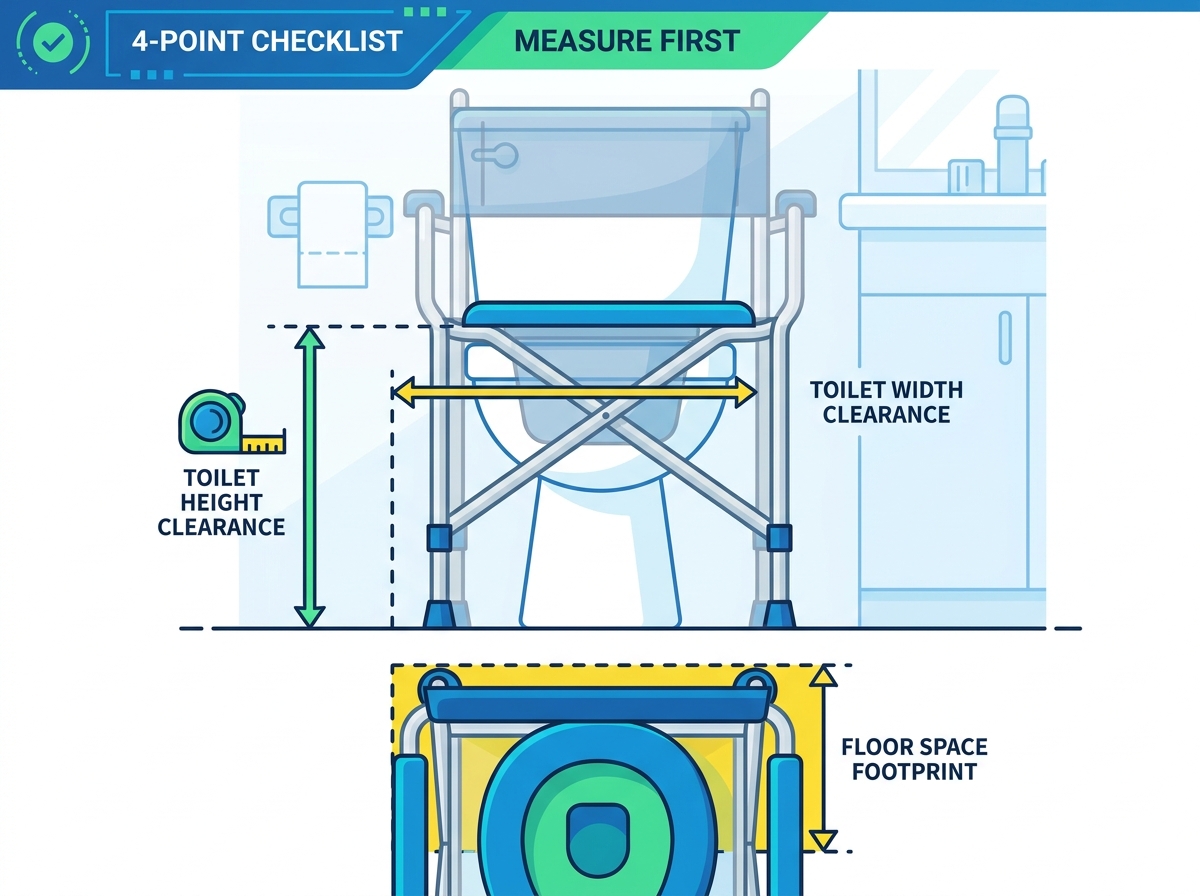
The 4-Point Measurement Checklist for Over-Toilet Commode Chairs
You cannot eyeball bathroom dimensions. Relying on visual estimates leads to constant returns and unsafe conditions. Follow this strict four-point checklist. Grab a metal tape measure. Write down each specific number before browsing any product catalogs.
1. Maximum Toilet Height Clearance
You must measure the toilet height accurately. First, lift the existing seat and lid upright. Better yet, remove them entirely for a cleaner measurement. Measure from the bathroom floor directly to the top of the porcelain rim. Do not measure to the top of the plastic seat. The chair requirement here remains strict. The chair’s minimum cross-brace height must be taller than your recorded measurement. If the rear brace sits lower than the rim, the frame hits the toilet. It will not slide back into the proper position over the bowl.
2. Maximum Toilet Width Clearance
Next, check the maximum toilet width. Stretch your tape measure across the widest point of the toilet bowl. Sometimes, older toilets feature a base wider than the upper bowl. If so, measure the base width instead. The chair requirement focuses on interior clearance. The distance between the commode’s interior rear legs must easily clear this maximum width. You need at least one inch of breathing room on each side. If the aluminum legs scrape the porcelain, the frame will sit crookedly. This uneven stance creates an immediate tipping hazard.
3. Bathroom Footprint and Stance Width
Look beyond the toilet itself. Measure your available bathroom footprint. Check the floor space around the fixture carefully. Factor in vanity cabinets, bathtubs, and swinging entry doors. Most chair frames widen at the base to provide extra stability. Therefore, the exterior stance measures wider than the seat itself. The chair requirement demands a perfectly flat landing zone. All four legs must sit flat on the main floor. They cannot rest partially on heating vents. They must avoid uneven tile transition strips. A single leg resting on an elevated surface causes the entire unit to rock.
4. Patient Ergonomic Height
Finally, you must measure the patient. Have the user sit in a standard chair. Ensure they wear their usual supportive indoor footwear. Measure the distance from the floor to the crease behind their knee. The success criteria focuses on reducing joint strain. The chair’s adjustable seat height must match or slightly exceed this number. A slightly higher seat minimizes hip flexion strain significantly. This proves especially critical for post-surgery recovery. Knee and hip replacements demand minimal joint bending during the sit-to-stand motion. A seat set too low forces the patient to pull themselves up aggressively. This sudden exertion risks muscle tears and accidental falls.
Standard vs. Bariatric vs. Drop-Arm: Aligning Chair Type with Reality
You must align your chair type with daily physical realities. Different mobility challenges require highly specific structural designs. Buying the wrong frame style severely limits patient independence. We break down the primary options to clarify your choices.
Standard over-toilet commode chairs: These models serve well for temporary post-op recovery. They usually feature a lightweight fixed frame. Manufacturers build them to support a 250 to 300 lb weight capacity. They remain highly space-efficient. They fit into tight residential bathroom layouts easily. However, they restrict sideways transfers completely. The fixed armrests block lateral movement. Patients must possess the leg strength to stand up, pivot, and sit down safely.
Drop-arm commodes: These chairs allow one or both armrests to swing out of the way. You push a release button to drop the arm flush alongside the seat. This feature remains absolutely essential for slide-board transfers. Wheelchair users rely on drop-arm models daily. The patient slides directly laterally from the wheelchair cushion onto the toilet seat.
Implementation consideration: This action requires significant extra space. You need an additional 6 to 10 inches of lateral clearance in the bathroom. The wheelchair also needs a clear parking spot right next to the fixture.Bariatric models: Manufacturers build these using reinforced steel or heavy-duty aluminum tubing. They feature significantly wider seating areas to accommodate larger frames. Capacities commonly exceed 500 lbs.
Implementation risk: The base footprint measures noticeably wider than standard units. Many older bathrooms lack this necessary floor space. The widened leg span might not fit between the toilet and an adjacent vanity. Always verify your floor clearance strictly before ordering heavy-duty models.
Chair Type Comparison Matrix
| Chair Type | Typical Weight Capacity | Transfer Style | Space Requirement |
Standard Fixed Frame | 250 - 300 lbs | Stand and Pivot | Minimal (fits most spaces) |
Drop-Arm Frame | 250 - 300 lbs | Lateral / Slide-Board | Moderate (needs side clearance) |
Heavy-Duty Bariatric | 500+ lbs | Stand and Pivot | Maximum (requires wide stance) |
Hidden Implementation Risks: Plumbing, Baseboards, and Wet Rooms
Measuring the toilet represents only the first step. Bathrooms often contain hidden architectural obstacles. These environmental hazards prevent proper equipment installation. We highlight the most common hidden risks below so you can plan accordingly.
Wall clearance and plumbing traps: Older homes often feature exposed plumbing behind the toilet. You might find bulky S-traps or water supply lines protruding from the wall. Rear cross-bars on some chair frames sit very low. They may strike these exposed pipes during installation. This strike prevents the unit from sliding far enough back over the bowl. If the chair sits too far forward, the splash guard misses the target. Check your wall clearance carefully. Measure the usable depth from the wall pipes to the front of the toilet bowl.
Baseboard heating and tile lips: All four legs must rest on a perfectly level surface. Bathroom floors often feature uneven tile transitions near the shower. Baseboard radiators line the walls in colder climates. If a rear leg rests on a radiator lip, the frame tilts forward. This causes severe and dangerous instability. You must inspect the perimeter of your toilet area carefully. Look for floor drains, thick grout lines, or decorative trim. Choose a frame featuring micro-adjustable legs to counteract slight floor slopes.
Dual-purpose shower usage: Sometimes, users need equipment for multiple hygiene tasks. You might plan to use the same unit inside a roll-in shower. If so, evaluate the wheel and caster lock quality thoroughly. Cheap plastic locks fail quickly on wet tile floors. Rust-resistant frame materials remain mandatory. Choose anodized aluminum over powder-coated steel. Steel eventually rusts when exposed to daily shower water. Rust weakens the structural joints over time. It compromises long-term safety and leaves ugly stains on your shower floor.
Shortlisting Logic: Your Final Decision Matrix
You have your measurements. You understand the hidden architectural risks. Now you must apply strict shortlisting logic. Follow this final decision matrix to ensure absolute success.
First, verify the math strictly. Use this simple comparative formula checklist before checking out. Do not bend these rules.
Toilet width must be strictly less than the chair inner leg width.
Toilet height must be strictly less than the chair cross-brace clearance.
Chair outer footprint must be strictly less than the available bathroom floor space.
If any single measurement fails this test, discard that model immediately. Do not force a bad fit. A tight squeeze inevitably leads to scratched porcelain and unstable seating.
Next, consider compliance and medical eligibility. Standard and specialized units are routinely covered by Medicare Part B. You can also reimburse these items via FSA or HSA accounts. However, this coverage requires proper documentation. A doctor must deem the equipment medically necessary. You will need a formal prescription detailing the patient's mobility limitations. Ask your healthcare provider for the required paperwork before making a purchase. Securing a Doc Req (Documentation Requirement) upfront prevents reimbursement denials later.
Your next step action requires immediate effort. Take a tape measure to your bathroom right now. Record the four critical dimensions we discussed earlier. Write them down clearly on paper. Compare them exclusively against the manufacturer's official specification sheets. Do not rely on promotional lifestyle images. Marketing photos often distort scale to make rooms look larger. Trust the written, numerical specifications only. Relying on hard data guarantees a safe, functional fit.
Conclusion
Finding the right fit requires diligence and an exact tape measure. You must prioritize structural clearance over aesthetic features every time. A beautiful frame means absolutely nothing if it tips over during a transfer. Rely on the dimensional checklist to guide your final purchase. Measure your bowl height and width accurately. Inspect your floor space for hidden baseboards and protruding plumbing traps.
Always remember to secure a bottomless splash guard. You cannot use a solid bedside bucket over an existing toilet safely. Ensure the patient's specific physical limitations dictate the armrest style. Wheelchair users absolutely need drop-arm functionality to slide safely. Stand-and-pivot patients do perfectly fine using fixed frames. Use this framework to confidently choose a secure, reliable bathroom aid. Your careful measurements will protect the patient and grant them invaluable independence during their recovery journey.
FAQ
Q: Can any bedside commode be used over a toilet?
A: No. A standard bedside setup relies on a solid collection bucket. To use it safely over an existing toilet, you must remove this bucket entirely. You replace it with a bottomless splash guard. This plastic sleeve directs waste directly into the toilet bowl. Without it, waste easily splashes onto the floor and the porcelain rim. Always verify your unit includes this specific sleeve before attempting over-toilet use.
Q: Do I need to remove my existing toilet seat to use an over-toilet commode?
A: You do not strictly have to remove it. You can simply lift the seat and lid upright. However, removing them entirely provides maximum clearance. It also improves daily hygiene significantly. Leaving the seat attached creates tight crevices. Waste can easily trap in these narrow spaces. Removing the existing seat gives the splash guard a direct, unobstructed path downward into the bowl.
Q: How do I clean an over-toilet commode chair?
A: You should clean the frame daily. Use non-abrasive household cleaners. Harsh chemicals can degrade the plastic seat and corrode the metal joints over time. Wipe down the splash guard thoroughly after every single use. Pay special attention to the underside of the seat. For deeper cleaning, remove the splash guard entirely and wash it in a utility sink. Dry the frame completely to prevent slips.
Q: Does Medicare cover over-the-toilet commodes?
A: Yes, Medicare Part B typically covers them as durable medical equipment (DME). However, you must meet specific medical necessity criteria first. Your doctor must provide a prescription stating you are confined to your room or unable to safely access a standard bathroom fixture. Medicare usually covers standard models. Upgrades like drop-arms or heavy-duty bariatric frames require additional justification documentation from your physician.

Get our 2026 Product Catalogue & Book a VIP Meeting
Leave your contact information and our online customer service will contact you shortly.
Reserve a 15-min VIP Consultation with our Engineering Lead. The number of places is limited.
